Category Archives: Miscellaneous

Just random stuff

Making Polaroid / INSTAX Style Prints With An Epson EcoTank Printer

I purchased an Epson ET-4700 Ecotank Printer back in January of 2020. We needed to replace an old HP Color printer that we mostly used for occasional color documents and kids projects. The ink cartridges were super expensive, and the color cart would need replacement if any one of the CMY colors ran out.

My Epson EcoTank ET-4700

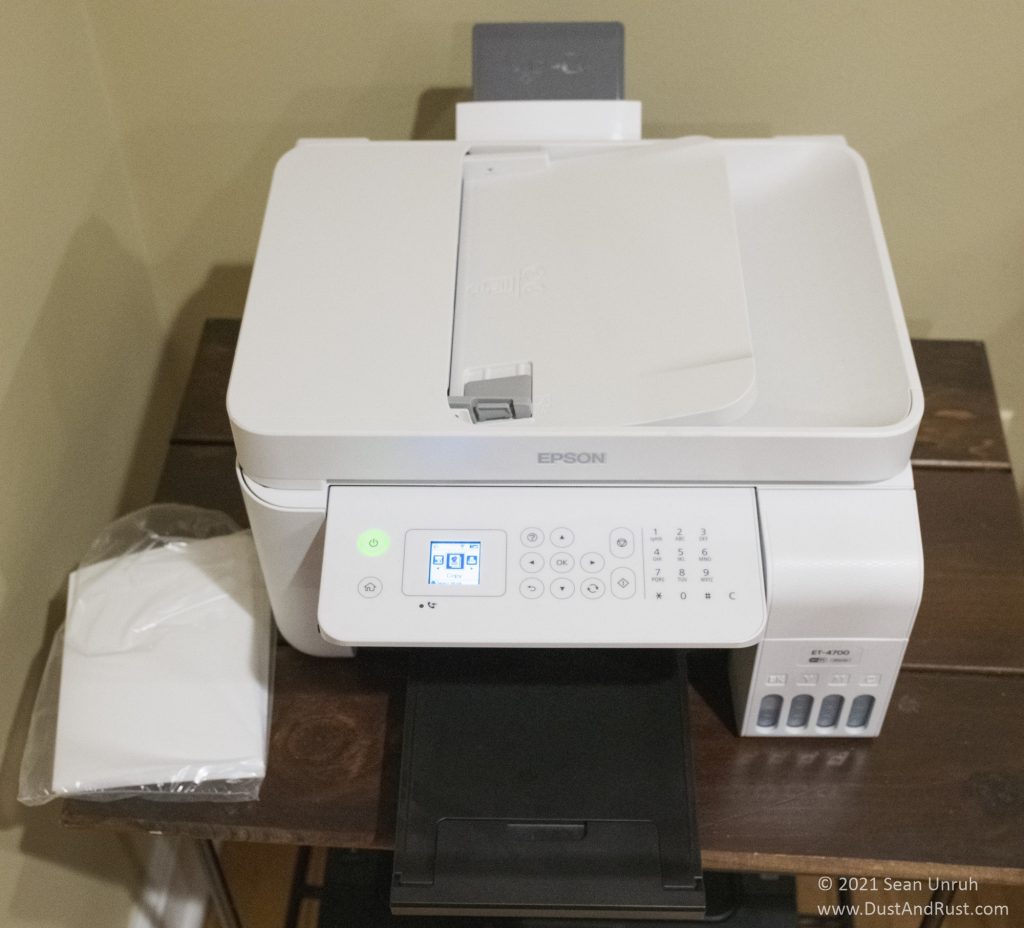
I did a little research and picked up the 4700 for less than $250 which included a full set of 4 Inks. It works great for the intended use, and amazingly, I have not needed to buy any ink yet… the black ink is down to about 40% left, and the color inks are all at about 70% remaining.

I also print side by side 3D photo cards (see this post) and occasionally 5×7 prints on this cheap HP Photo Paper. I gave up on printing large prints at home and use WhiteWall for anything I will hang up on my walls.

In April of this year, I picked up a FujiFilm X100V and started looking into FujiFilms Instax Printers. I was interested in the new Instax Share Wide, but the X100V can’t do direct prints (you need to use the App) and the SP-3 which can be used directly, but appears to be discontinued.

So what are the qualities of a Polaroid / Instax image that makes us nostalgic?

A scanned film image from my collection, with scratches and “gritty” color… cropped to a perfect square for Instagram or ???
  • Being able to take a photo, watch it develop before your eyes, and share it almost immediately.
  • The form factor (that people remember) consisting of a square image surrounded by a white border, with a heavier bottom border. in other words, the prints came with their own “matte” right out of the camera.
  • Each image was a unique moment, that unlike negative film could not easily be duplicated. Of course today, we can easily convert them to a digital format, but in the ’70’s and ’80’s, even if it was possible, it was not easy or convenient.
  • The image quality on the consumer film was not that great, but people were ok with that because of the novelty.
  • The film itself was very glossy, durable, and made of plastic. Basically inside of each photo was a pocket that held the developers.

So while I was getting frustrated looking for the right Instax printer, not excited at the price of a pack of film (around the same price as 60 sheets of 5×7 photo paper), I decided to make my own “polaroids” with what I had on hand. 5×7 paper, Epson ET-4700 printer, paper cutter, and a DataColor SpyderPrint in a box in my basement.

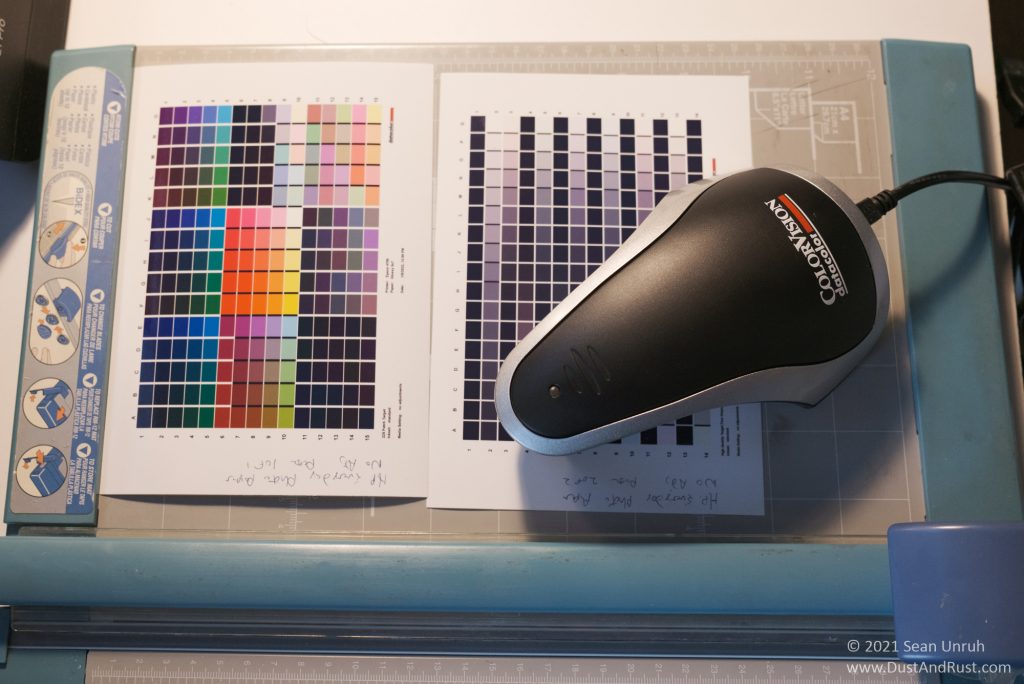
I created an ICM profile for the HP Paper, and did some highly complicated math to create a slightly enlarged version of the “standard” Polaroid framing…

Lightroom Print Template Created for a 5×7 page size.

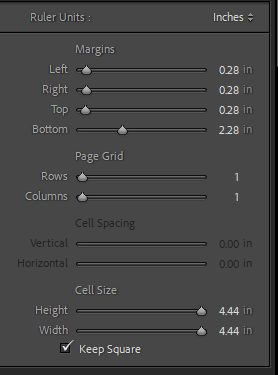
The above settings for a 5×7 print in LightRoom will give you very Polaroid-esque print. After printing, just cut exactly 1 inch from the bottom border, making a 5×6″ print with a 4.44 inch square image.

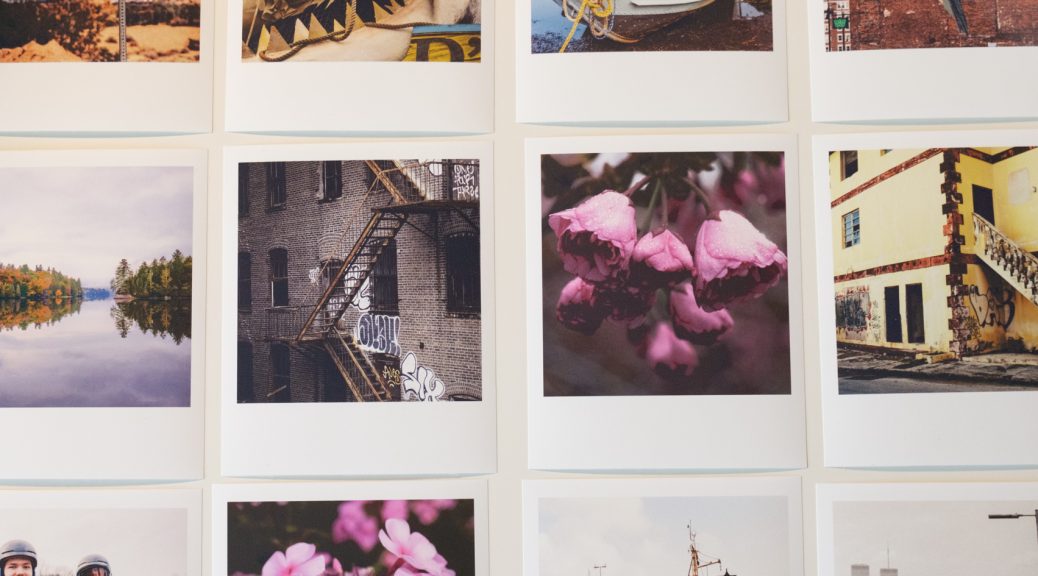
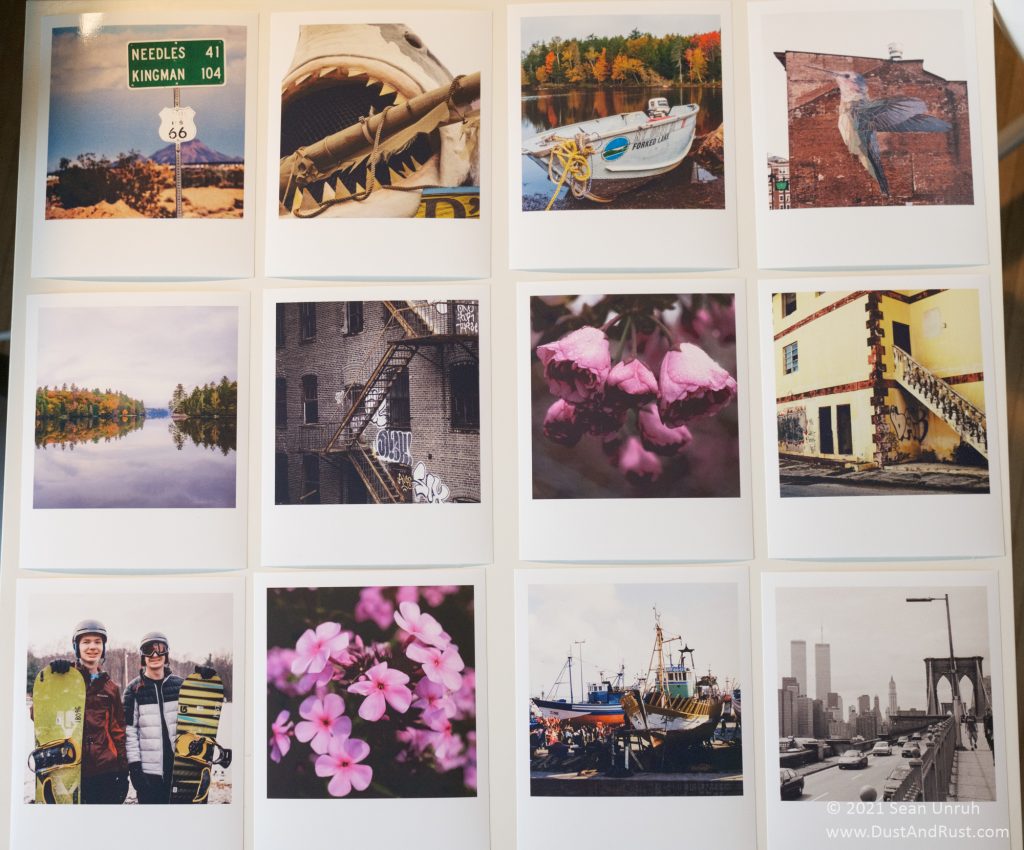
I printed the photos below in less than an hour (that included picking the photo, cropping, and printing). The custom profile works great. Because the ET-4700 does not have a photo-black ink, the blacks lack some contrast… just like the film! Combined with the fun FujiFilm film simulations, you can get that nostalgic feeling with ease, and the print quality is probably a bit better than instant film.

Prints made on Epson EcoTank 4700 and 5×7 photo paper

I really enjoyed this stroll down Instax Lane. While the printing process is not quite as fun as watching a Polaroid develop, and the tactile feel is not even close to the original, the prints still “feel” like Polaroids when i look at them. I still might buy an Instax printer, or maybe even a camera down the road. Fujifilm… make a combined “Camera/Printer” model and I’ll buy it!

Lessons learned :

  • I should have purchased the EcoTank printer that has a photo black ink.
  • Next time I order 5×7 photo paper, I will spend a little more money and get heavier paper stock… it would be better for prints I want to give to people.
  • I need a good way to display these prints!

Building a NAS (for photos and more) Part III

View Part I here and Part II here.

Step 5. Setting it all up

I started by building the PC with a boot drive installed. I left the data drives out until I was ready for them. cable
Ubuntu Server 12.10 is fairly easy to install, most of the defaults are fine for the initial setup. I had to put a video card and keyboard on the machine so I could do the setup. They only thing you really need to do is assign the server an IP address on your network (dhcp is the default out of the box).

Motherboard

After setting up the server, I updated all of the packages, and installed webmin Webmin gives you an easy way to remotely administer your server through a browser. You should also install a tool like Putty on your client pc, so you can use ssh to get a terminal window on the server.

Step 6. ZFS
To protect against a drive failing, most NAS boxes use some form of RAID. Raid-5 allows your system to keep running if a single drive fails. There are other levels of raid that provide varying levels of performance and redundancy. While my motherboard supported INTEL Rapid Storage at the Bios level, after a lot of research I decided to use ZFS on linux and RaidZ. ZFS offers excellent data integrity features, and some great features like compression, de-duping and snapshots. I wound up not using the de-duping or compression features, since my files were not going to compress well, and de-duping is a great feature for a business scenario where different users may have duplicate copies of documents in their network folders, it can drastically increase memory usage. Snapshots are a great feature that can help restore files that have been deleted or changed.

Plex – The ultimate in media sharing
Plex is a free media server available on multiple platforms. The slick web interface has improved with each recent release. There are clients for iOS, OS X, Windows and Android (including Google TV). You can even share media across the internet with friends and family. We have an old iPad, a Vizio Co-Star Google TV box, Macbook Air, Windows PC’s and multiple Android phones and tablets. Plex has been running great in all cases. The Android app in particular has improved immensely in the last few months. The main issues to be aware of with Plex related to video. If the device you are trying to stream video to does not support the format the video is encoded with, Plex can attempt to re-encode it on the fly. This will require some decent horsepower on your server (see here). In my case, the older Quad Core Intel CPU in my server has worked very for my setup where only one stream is being encoded at a time. If you are a huge fan of iTunes, you should also be aware that because of the way Plex deals with the Apple software, only Windows or Mac servers can support iTunes as a client.

To Sum Up
The combination of Ubuntu Server, ZFS and Plex offer an amazing platform for Network Storage and home Media serving. The only cost involved is your own time and the hardware. The key is to decide what you want to do before you start building. If you just want to share files on a network, a low power PC, some good hard drives and a fast network (gigabit ethernet on the server, router, and main clients) is the way to go. If you are just sharing music and videos (with out the need to re-encode them on the fly), a used laptop, or Mac Mini with a large external hard drive can be a low cost option. Building your own server, installing and configuring some form of Linux and setting up a Raid file system is not for everyone. If you do decide to take the plunge, take your time and do the research. If you do take the plunge, it can be a great learning experience and a way to bring out your inner geek 🙂

The Last Word
Regardless of where your files live, having a backup strategy is not optional. I personally keep one hard drive in my house with a recent full backup, and another at my office. Raid based file systems are not a backup strategy. They are designed to keep your files available if a drive fails (depending on the Raid level). Raid will not help you if a voltage spike fries all of the drives in the server, or a fire destroys them. If you value your “digital life” make sure you do real backups… and do them often.

Building a NAS (for photos and more) Part II

Start with Part I if you haven’t read it already.

Step 3. Choosing an operating system (continued)
I use Windows 7 at home, and I would have no problem recommending it as a home server operating system. It has a familiar interface, has good hardware support, and from my experience it is very stable. From the perspective of building a home NAS as cheaply as possible, its not the best choice. Out of my 4 options, it is the only one that is not free. I also wanted to optimize my NAS as a headless system… meaning that it would not be connected to display or keyboard while running. For these reasons, I crossed it off my list.

Motherboard

FreeNAS is an OS based on FreeBSD. It caught my eye and I started doing research on it. It turns out FreeNas is maintained by a company called iXSystems. In many cases you will find references to FreeNas on the Web. The older version of FreeNas is now maintained in a different fork called Nas4Free. FreeNas is currently more focused on storage solutions and less about media serving. This removed it from my list.

Nas4Free was formally called FreeNAS. It has lots of features for media sharing like DLNA support (to an extent). The OS itself is easy to install and run off of a simple USB key drive, which can save you from having a boot drive in your system. If it supports all of the features you need, it can be a very good choice. One thing Nas4Free is missing is support for the Plex applications. If you are going to buy a pre-built NAS+media server, I suggest checking out Plex and looking at the products that support it. Lack of Plex support was really the deal killer for me.

I’ve used Ubuntu Desktop in a VMWare virtual machine previously. As I learned more about what features I wanted in my NAS, it made more and more sense to move to a full blown Linux install. Plex runs on Ubuntu and it also has support for the ZFS file system which I will elaborate on further later on. It’s a little more complex to set up, but in the end, flexibility, enterprise level features, and application support were worth the effort for me. Ubuntu Server FTW!
Step 4. Hardware decisions

cable

I already had a good Motherboard, a quad core Intel Q9450 processor, 4GB of ram, a power supply and a case. I did buy an Intel Celeron-L 440 processor for $8 on eBay thinking it would save a little power. I also invested in a Kill-A-Watt meter which can give you real time and average power consumption. My hope was to get power consumption under 100watts. NAS systems built on Intel Atom motherboards can get down under 30 watts, but for a system that does more than just serving files, you probably need some more horsepower. The main feature your motherboard needs is the right number of SATA ports. My board has 8, which is great for future expansion if I need it. I would probably want a least 4 if I were buying a new or used board.
The other big choice to make is which hard drive to buy. Western Digital has done a great job of creating a line of drives for the NAS market… WD Red. It seems counter-intuitive at first, but a desktop drive that spins down and parks the heads when not being accessed doesn’t really work well in a NAS. Sleeping drives cause delays when you access your NAS, and there is also the “TLER issue” which causes havoc with Raid Arrays. The Red drives also have very good power consumption numbers. A good review if the Red drives can be found here. I picked up 3 2TB drives from B&H… who had the best price at the time.
I also wanted to mention power supplies. A PC Based NAS without a Video Card will use between 80 and 150 watts depending on how you configure it, and how many drives you need. Power supplies usually operate at peak efficiency at about 50% load. So a 300 Watt power supply is probably a good choice… and an 80 Plus certified supply will help keep the power usage down. Consistent voltages and clean power are important to systems that are running 24/7, so don’t skimp on the power supply!

Continue on to Part III